
When addressing accessibility concerns for your website, you may already be aware that any auxiliary documents linked to your website, such as PDFs, Word Docs, PowerPoint Presentations, Excel Spreadsheets, and more, need to meet ADA compliancy standards as well. But how do you know whether or not your documents are compliant?
An ADA compliant PDF is a PDF which has been structured during its creation or edited to adhere to ADA (Americans with Disabilities Act) standards, such that it can be read or processed using assistive technology such as a screen reader. A PDF that is ADA compliant will conform to the WCAG 2.1 Level AA for accessibility.
 PDF documents are everywhere and comprise a remarkable portion of all digital files. Bank statements, paperless bills, digital invoices, job postings, product brochures, application forms – almost all of these are PDF documents. So why is accessibility such a concern? Those with visual disabilities don’t “read” PDFs the same way that sighted people do. While someone with normal vision can see the contents of a PDF document, a blind or visually impaired person needs to use assistive technology to “see” the information. This includes the use of screen readers, text-to-speech-outputters, braille printers, and more.
About 15% of the world’s population lives with some form of disability. As the years progress, that number will only increase – computer-savvy users will age into vision impairment and will increasingly rely on assistive technologies to read their online documents.
How do I tell if my PDFs are ADA compliant?
To individuals with normal vision and no color blindness, an inaccessible PDF may look perfectly readable. This is why determining accessibility simply by looking at it is a challenge. Your PDF must also be coded correctly when it’s created, such that people with visual disabilities can read it. Failing this, your organization may be liable to accessibility lawsuits under the Americans with Disabilities Act (ADA.)
Some common accessibility issues for PDFs include:
- Missing or incomplete Metadata. Your document must include title, author, subject, and keywords to be fully compliant.
- Not tagged. If a PDF doesn’t have tags, it’s not in compliance with accessibility standards. PDF tags are the key to accessing a PDF’s content with assistive technologies. Tags are assigned to each page element in the document, and stores some information about it.
- Bad tag structure. If your document is improperly tagged, it’s still not accessible. One example of this is neglecting to specify the reading order of your tags.
- Images missing alt text. Without alt text, a screen reader will announce that there is a graphic on the page, but it won’t know why or how it’s important. Providing alt text provides some information.
- No bookmarks. In documents longer than 9 pages, bookmarks aid in navigation. Generally speaking, these should match your headings.
- Image-only PDFs. If the PDF is a scanned document, each page is treated like one big picture. Running OCR (Optical Character Recognition) converts scanned text to searchable/taggable/readable text, which makes the document accessible.
- Incorrect or missing table headers. For data tables to be read correctly by assistive technology, the headers need to be defined, and their role (column or row) assigned correctly.
How can I check the accessibility of my documents?
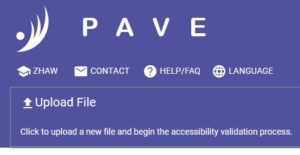 There are a number of tools you can use to determine whether or not your PDF documents are ADA compliant. One such free online tool is PAVE – the PDF Accessibility Evaluation Engine. Simply upload your PDF, and you’ll be provided with a list of issues your document has. PAVE allows you to fix many issues right on the spot, then download a cleaned and accessible version for replacement on your website. PAVE does have limitations – some issues can be detected using their service, but you must edit your PDF in Adobe Acrobat or a similar PDF creation tool to actually fix the issue.
If you have Adobe Acrobat Pro or DC, you can use the CommonLook PDF Validator. This is a free plugin for those programs which tests your PDF document for various accessibility standards including Section 508, WCAG 2.0 AA, and others.
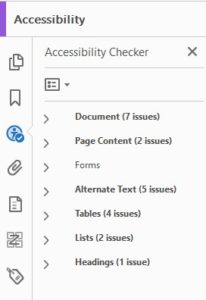 An option for Acrobat is using the “Quick Check” option in the accessibility panel. This checks for tags. Full accessibility checks are currently only available inside Acrobat Pro. If you have Acrobat Pro, you can perform a full accessibility check by doing the following:
- Click “Full Check” in the Accessibility Panel.
- Check “Create Accessibility Report and Create Comments in the document.
- Scroll down the Full Check dialog box and under “Checking Options”, select any items you want to check.
- Click “Start Checking.” This generates a report and creates comments in the document. Any errors are reported in the comment notes.
What makes a PDF compliant with accessibility checkers?
Your PDF will be tested for several accessibility standards. First, a structural check will be performed. This is included but not limited to proper construction of lists, tables, and tables of contents. It also verifies that links are not broken and tags are not empty.
Next, an accessibility verification will be performed, testing your document against one or more specific accessibility standards such as those mentioned above, PDF/UA, HHS (the original standard), HHS 2018, and WCAG 2.1.
Is there anything I can test by myself?
There are things you can definitely test on your own in terms of making your PDFs ADA compliant. The University of Washington has an excellent checklist that you can start with. Additionally, WEBAIM has a very detailed tutorial for checking accessibility in Acrobat. Or, you can start by asking yourself the following questions.
- Does my document contain text? If the document is a large image, it will need to be converted to readable text. You can do this in Acrobat by going to View->Tools->”Recognize Text.”
- Is my document tagged? PDF “tags” determine the order and structure of PDFs for screen reader users, and the Tags pane in Acrobat allows you to view, reorder, modify, create, or delete these tags. You can get to the Tags pane by going to View->Show/Hide->Navigation Panes->Tags.
- Is my document assembled in reading order? To check this, use the Reading Order Tool (or TURO in older versions of Acrobat.) To use this, go to the Accessibility Tools and select Reading Order. The appearance of your PDF will change – the content will become encased in numbered grey boxes. If this doesn’t happen, your PDF document is likely untagged, and you need to revisit step 2 and add your tags before proceeding to this step.
- Do my images have alt text? To add or edit alternative text, right click on the image and select “Edit Alternate Text.” Alt text is a short description of the image which makes it accessible to vision-impaired users who rely on assistive technology.
- Does my document have tables? If yes, use the Table Inspector. This can be found within the Reading Order tool described in step 3. This WEBAIM tutorial will help walk you through repairing inaccessible tables.
For Acrobat Pro Users
 If you’re using Acrobat Pro, try the “Make Accessible” Action Wizard. Action Wizards automate common multi-step processes in Acrobat, including several common steps in creating an accessible PDF. It is a helpful way to ensure you don’t miss any steps while making your document accessible. To run the wizard, use the Tools tab to add Action Wizard (it should be visible by default in Acrobat XI), then open Action Wizard and choose “Make Accessible.” The wizard will then run you through several steps necessary for guaranteeing PDF compliance.
In Summary
It’s very likely that your PDFs won’t be accessible on their first pass through the inspection software. At this point, you’ll need to either make your file accessible using the software, or you’ll need professional help; especially if you have a huge number of PDF files. If you are looking for a top-notch company to work with, White Whale Web Designs specializes in all ADA website compliance concerns, and can help you bring your PDF documents up to accessibility standards.